Transforming ordinary ingredients into an extraordinary, spine-chilling centerpiece is the magic of an eyeball cake recipe. Perfect for Halloween parties, spooky gatherings, or just a fun, ghoulish dessert, these ocular confections are guaranteed to turn heads and delight taste buds. While the visual impact is universally eerie, the methods for achieving this edible anatomy can vary significantly. This article delves into two popular approaches: the creamy, no-bake cheesecake eyeball and the strikingly marbled baked cake, helping you choose the perfect "eye" for your next event.
The Allure of the Eyeball Cake: A Ghoulishly Delicious Centerpiece
There's something uniquely captivating about an eyeball cake. Perhaps it's the unsettling realism, the unexpected blend of horror and sweetness, or simply the sheer creativity involved in recreating such a complex organ in edible form. These cakes aren't just desserts; they're conversation starters, edible art, and a true test of one's ability to embrace the delightfully macabre. The key to a successful eyeball cake lies in meticulously crafting its various parts: the vibrant iris, the deep pupil, the stark white sclera (the "white" of the eye), and of course, those tell-tale bloodshot veins and gory accompaniments.
Whether you're aiming for a pristine, unsettling gaze or a more gruesome, bloodied effect, an eyeball cake recipe provides a canvas for your darkest culinary fantasies. The choice between a no-bake and a baked version largely depends on your desired texture, time commitment, and baking prowess.
Option 1: The No-Bake Cheesecake Eyeball Cake – Quick, Creamy, and Impressive
For those seeking a show-stopping dessert without the hassle of baking, the no-bake cheesecake eyeball cake is a fantastic choice. This method leverages the convenience of pre-made mixes and the setting power of gelatin to create a surprisingly realistic and utterly delicious treat. It’s ideal for busy hosts who still want to make a big impact.
Crafting the Ocular Details: Gelatin, Cheesecake, and Gory Garnishes
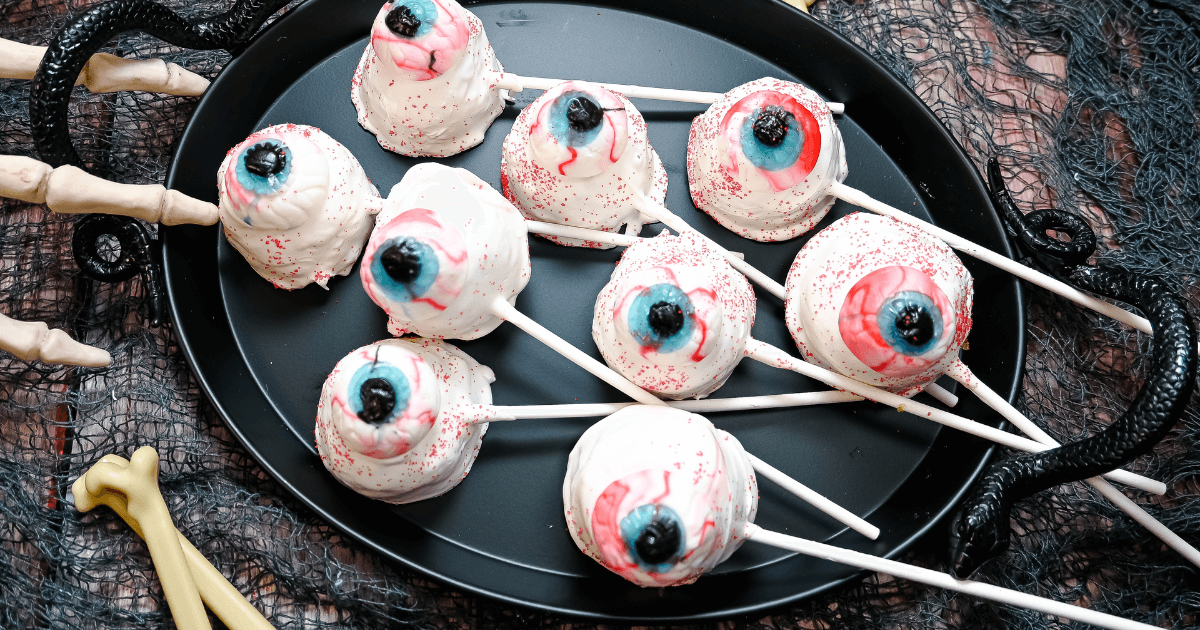
- The Pupil & Iris: Gelatin Magic for a Piercing Gaze
The brilliance of this method begins with gelatin. A small amount of black gelatin forms the pupil, precisely cut with a round cutter into the bottom of your mold. Over this, a layer of vibrantly colored gelatin (like berry blue, as in our reference, or even electric green or amber for different eye effects) creates the iris. The trick is to ensure each gelatin layer sets firmly before adding the next, and if a layer sets too much, a quick zap in the microwave can loosen it for pouring. Precision in cutting the pupil and carefully pouring the subsequent blue gelatin ensures a crisp, defined eye. For more detailed guidance on achieving that realistic look, check out our guide on Master the Eyeball Cake: Realistic Veins & Gelatin Iris. - The Eyeball: Creamy Cheesecake Base
Once your pupil and iris are set, the bulk of the eyeball comes from a no-bake cheesecake mix. Blended with milk, the mixture should be thick yet pourable, carefully poured over the gelatin layers. Gently tapping the bowl releases air bubbles, ensuring a smooth "white" of the eye. This not only provides a delicious contrast in texture to the gelatin but also offers a delightfully creamy experience. For a personal touch, consider adding a hint of vanilla bean paste or almond extract to the cheesecake mixture to elevate its flavor beyond the standard mix. - The Crust: A Bloody Graham Cracker Foundation
The base of this unique cake is a striking red graham cracker crust. Melted butter, infused with red gel food coloring, is combined with crushed graham cracker crumbs and sugar. This not only provides a sturdy foundation when flipped but also adds to the gruesome aesthetic, resembling a bloody, pulpy mass. For a more intense "gore" effect, you might use chocolate graham crackers or even crushed Oreo cookies for a darker, earthier tone. - Garnishing for Gory Detail: Veins and "Blood"
After the cheesecake and crust have thoroughly set, the cake is inverted onto a serving platter. The final, crucial step is the garnish. Red writing gel is piped on to create branching "veins" across the white of the eye, giving it that bloodshot, eerie appearance. Surrounding the base with cherry pie filling adds the ultimate touch of "blood" and gore, completing the illusion. Raspberry jam or even a simple strawberry coulis can also work wonderfully here for a slightly different flavor profile and texture. You can find more creative ideas and tips for this particular dessert in our No-Bake Eyeball Cake: Spooky Halloween Dessert Guide.
Pros of the No-Bake Cheesecake Eyeball Cake: Quick preparation, no oven required, creamy texture, excellent for beginners, high visual impact.
Cons: Less traditional "cake" texture, relies on mixes for convenience.
Option 2: The Marbled Eyeball Cake – Baked Brilliance with a Twist
For those who prefer a traditional baked cake and relish the challenge of a more elaborate presentation, the marbled eyeball cake offers a unique and visually stunning alternative. This method utilizes colored cake batter to create a swirling, almost psychedelic iris effect, making each slice a delightful surprise.
From Batter to Bloodshot: Baking a Ghoulish Masterpiece
- The Cake Base: A Classic Canvas
This approach starts with a robust cake recipe, typically featuring ingredients like egg whites, whole milk, vanilla, cake flour, all-purpose flour, sugar, baking powder, and butter. The precise balance of these ingredients ensures a tender, moist crumb, providing the perfect canvas for your edible eye. Using room-temperature butter and eggs is crucial for achieving a smooth, well-emulsified batter that bakes evenly. - Marbling Magic: The Iris and Bloodshot Effect
The magic happens when the cake batter is divided and tinted with various gel paste food colorings. Colors like electric green, orange, and royal purple (as suggested in the reference) can be swirled gently into the main batter, creating a mesmerizing marbled effect that mimics the intricate patterns of an iris, or even a bloodshot, veiny texture if swirled just right. The key is to swirl, not mix thoroughly, to maintain distinct color variations. Experiment with unexpected combinations like grays and sickly greens for a zombie-like eye, or yellows and oranges for a reptilian stare. - Frosting and Decoration: The Ocular Canvas
Once baked and cooled, the cake becomes the "white" of the eye, which is then typically covered in a smooth, pristine frosting. A Swiss meringue buttercream, known for its silky texture and stability, is an excellent choice for this, providing a smooth surface for further decoration. Other options include a classic American buttercream or even a cream cheese frosting for a tangy counterpoint. - The Pupil and "Gore": Confectionery Details
Unlike the gelatin pupil of the no-bake version, the pupil for a marbled cake is often created with confectionery. Malted milk balls, mini peanut butter cups, or even a large black candy can serve as the central pupil. Around this, an array of red candy-covered chocolates and sprinkles can be scattered to simulate blood vessels or gruesome debris. Gummy worms, crushed chocolate sandwich cookies (for "dirt"), or even edible sugar glass shards can further enhance the horrifying appeal, allowing for immense creativity in your presentation.
Pros of the Marbled Eyeball Cake: Traditional cake texture, allows for advanced baking techniques, highly customizable marbling, impressive baked presentation.
Cons: More time-consuming, requires oven use and baking skills, generally more ingredients involved.
Choosing Your Eyeball Adventure: No-Bake vs. Baked
Deciding between a no-bake cheesecake and a marbled baked cake for your eyeball cake recipe ultimately comes down to a few key factors:
- Time & Skill Level: If you're short on time or new to intricate baking, the no-bake option is your best friend. It simplifies many steps without sacrificing visual impact. Experienced bakers, however, might enjoy the challenge and creative freedom offered by the baked, marbled cake.
- Texture Preference: Do you crave the creamy, melt-in-your-mouth richness of cheesecake, or the fluffy, tender crumb of a traditional cake? Your preference will heavily influence your choice.
- Occasion: For a casual Halloween potluck where speed is essential, the no-bake cheesecake reigns supreme. For a more formal spooky dinner or a baking competition, the intricate beauty of a marbled cake might be more appropriate.
- Customization: Both types offer extensive customization. The no-bake focuses on gelatin color and garnish creativity, while the baked version allows for exploration in cake flavors, marbling patterns, and elaborate frosting work.
No matter which eyeball cake recipe you choose, the goal is to create a dessert that is as deliciously unsettling as it is memorable. Both methods offer unique advantages and allow for a high degree of creativity, ensuring your ghoulish creation will be the talk of the party.
Whether you opt for the quick, creamy convenience of a no-bake cheesecake or the intricate, baked artistry of a marbled cake, an eyeball cake recipe promises a dessert experience unlike any other. These culinary creations are more than just food; they are an invitation to embrace the playful side of horror, delighting guests with both their appearance and their flavor. So, gather your ingredients, unleash your inner mad scientist, and get ready to bake (or no-bake!) a truly unforgettable, ghoulishly delicious masterpiece that stares right back at you!
